

Okay, fellow food lover, I have to tell you about this Easy Yaki Onigiri moment that absolutely rocked my snack game! You know how sometimes you crave something that’s got that perfect combo of crispy, savory, and slightly sweet? The first bite of this Easy Yaki Onigiri – grilled rice balls glazed with that magical soy sauce glaze – blew me away. The outside has this irresistible crunch, almost like a little Japanese snack hug, while the inside is soft, warm, and comforting. It’s honestly one of those flavor-packed treats that taste simple but have layers of umami and just the right touch of sweetness from the glaze.
I remember spotting photos of Easy Yaki Onigiri all over social media, and the crispy onigiri edges glistening with soy sauce had my mouth watering immediately. I was obsessed enough to hunt down the best simple onigiri recipe and recreate this grilled rice ball magic in my own kitchen. Let me tell you, making Easy Yaki Onigiri at home gave me that real cozy, snack-on-the-go vibe with a flavor upgrade that felt like a restaurant-quality score.
This dish is such a vibe for anyone who loves a homey Japanese snack with a crispy edge, and I’m so pumped for you to try it. Whether you’re new to grilling rice balls or a seasoned pro, this Easy Yaki Onigiri recipe will have your taste buds cheering. Grab your soy sauce and rice cooker, because once you try these, you’ll want them in your snack rotation for life. Trust me, this is one simple onigiri recipe that’s ridiculously crave-worthy and totally worth the few minutes it takes to make. Let’s dive into what you need to make your own Easy Yaki Onigiri masterpiece!
What You Need
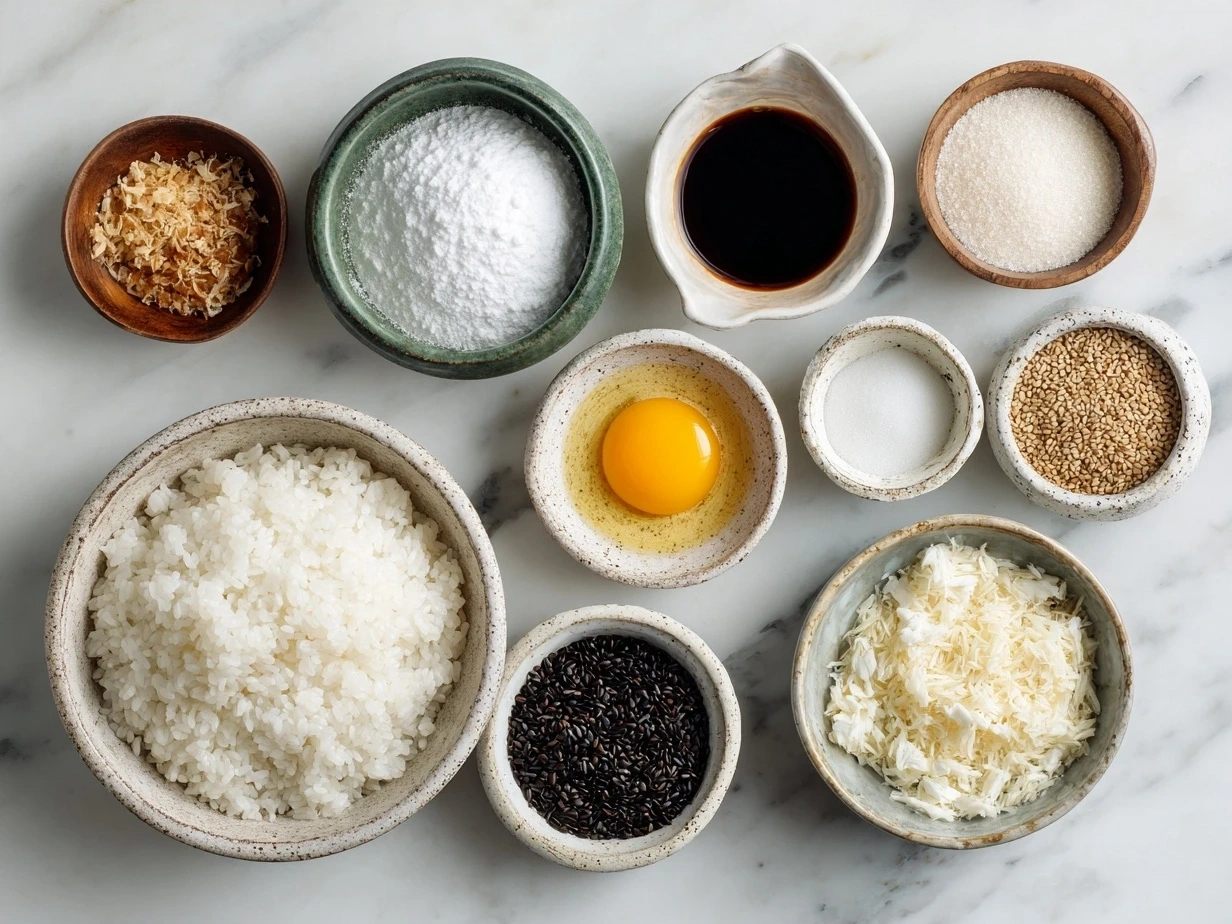
Here’s the ingredient lineup for your Easy Yaki Onigiri that makes these grilled rice balls next-level drool-worthy:
- 2 cups Japanese short-grain rice (Splurge on quality sushi rice from the international aisle for the perfect sticky texture)
- 2 1/2 cups water (for that perfectly hydrated rice)
- 1/4 cup soy sauce, preferably a naturally brewed one for deeper flavor
- 1 tablespoon mirin (sweet rice wine that gives that perfect subtle sweetness in the glaze)
- 1 tablespoon sesame oil (adds an amazing nutty aroma to your crispy onigiri)
- Optional: Furikake seasoning or a sprinkle of toasted sesame seeds (for texture and flavor boosts)
- Cooking oil (vegetable or canola works great for grilling)
Grab these basics for your Easy Yaki Onigiri and have your soy sauce glaze ready to slather these crispy onigiri. Don’t skip on quality soy sauce because that glaze is where half the magic lives! I also like to prep my rice in my trusty rice cooker and let it cool slightly so it’s sticky but manageable for shaping.
Pro tip: You can add little flavor upgrades like a tiny cube of miso or a hint of chili in the glaze for a kick. This Easy Yaki Onigiri gets seriously better when you swish it all over with a mix of mirin and soy sauce, giving your rice ball that crave-worthy finish. Storage-wise, keep leftover rice covered with a damp towel to keep it from drying out before you turn it into your grilled rice balls.
How to Make It
Get ready, because making Easy Yaki Onigiri is all about that crispy onigiri exterior and the saucy soy glaze that seals the deal. Here’s how to make your grilled rice balls shine:
- Cook your rice until it’s soft and sticky but not mushy. This Easy Yaki Onigiri recipe works best with rice that holds together nicely, so Japanese short-grain rice is a must.
- Cool the rice a bit, then wet your hands and gently shape the rice into triangles or rounds. Don’t press too hard because you want them nice and fluffy inside. This simple onigiri recipe is forgiving but still calls for gentle hands!
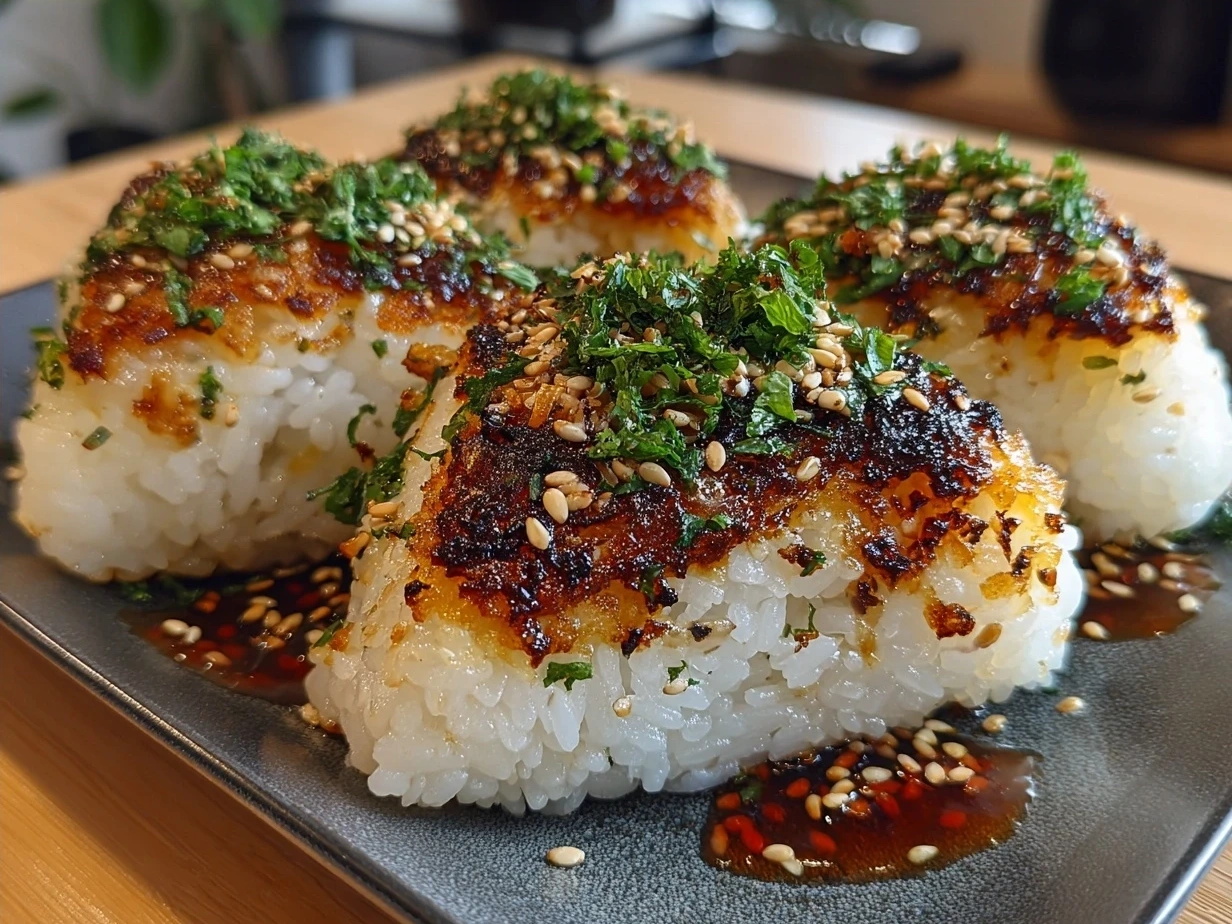
- Heat a pan with a little cooking oil over medium heat. Place your rice balls in the pan carefully. Listen for that sizzle — this is where the magic happens for crispy onigiri!
- Cook until golden and crisp on one side, then flip to the other side. Your Easy Yaki Onigiri should be golden and gorgeous with crispy edges that make every bite worth it.
- Brush your soy sauce glaze (soy sauce mixed with mirin and a splash of sesame oil) over each rice ball on both sides as they cook. The glaze caramelizes slightly to that beautiful deep brown color with a sweet-savory punch.
- Flip and glaze a couple more times, cooking for about 2-3 minutes per side to build that perfect crispy coating.
- Serve warm with optional furikake or toasted sesame sprinkling for a finished touch.
By now, your kitchen will smell like an umami dream! The soy sauce glaze gives this Easy Yaki Onigiri the kind of flavor you want to shout about to all your fellow food lovers. Pro tip: Press your grilled rice balls on a hot grill pan for extra smoky vibes if you want to feel fancy.
I learned early on that letting the glaze caramelize slowly helps avoid burning but keeps that addictive crunch. No joke, these little Japanese snacks taste like a million bucks without any fancy technique.
If you love this Easy Yaki Onigiri, check out this crispy yaki onigiri recipe with extra tips for grilled rice balls that bring strong traditional vibes!
Serving This Up
Okay, this Easy Yaki Onigiri deserves to be center stage at snack time or any casual meal. I love pairing these grilled rice balls with simple miso soup or some pickled veggies for a light but flavor-packed bite. It’s the kind of Japanese snack that’s perfect for lunchboxes, picnic treats, or that random afternoon when you want an umami hit with a crispy twist.
If you want to impress friends, serve warm Easy Yaki Onigiri on pretty plates with a small bowl of soy dipping sauce and maybe some edamame on the side. It’s such a crowd-pleaser and disappears fast. For leftovers, chop these into small pieces to toss in soups or salads, or pop them under a broiler to refresh that crispy onigiri texture.
For a seasonal twist, mix a little grated ginger or shiso leaf into the rice before grilling. This Easy Yaki Onigiri pairs beautifully with a hot cup of green tea or even a chilled sake on warmer days.
When I want a total snack vibe upgrade, I turn to combos with dishes like these melt-in-your-mouth chicken delights or try them alongside these protein pancakes for a balanced meal. They bring that fresh, crispy contrast to everything.
If you want a fun twist, try miso yaki onigiri variations that swap out the glaze for miso paste. So good, right?
Your Questions Answered
How do I make this Easy Yaki Onigiri extra flavorful?
Try adding a bit more mirin in your soy sauce glaze for sweetness or tossing in some grated ginger or chili flakes. A sprinkle of furikake on top adds umami depth. I also love mixing in bits of pickled plum inside the rice – so savory!
Can I meal prep Easy Yaki Onigiri?
Absolutely. Shape and grill your rice balls, then store them wrapped. Reheat by pan-frying again or under the broiler so you bring back that crispy onigiri charm.
What’s the best way to reheat Easy Yaki Onigiri without losing quality?
Air-frying or pan-frying is best to keep the exterior crispy. Avoid microwaving unless it’s a quick zap, then finish in a pan for texture.
Can I add fillings?
Yes! Try adding cooked salmon flakes, umeboshi (pickled plum), or even a bit of cheese for a melty surprise inside your Easy Yaki Onigiri.
What type of rice works best?
Japanese short-grain rice is key because it sticks well but is still fluffy once grilled.
Any shortcuts?
Using leftover rice works, just press firmly for shaping. And a non-stick pan with a lid helps cook evenly.
Are there vegan soy sauce glazes?
Totally. Most soy sauces are naturally vegan – just double-check for any added ingredients.
Want more inspiration? Check out this simple Yaki Onigiri recipe for beginners with easy tips that make grilling rice balls a breeze!
Final Bites
This Easy Yaki Onigiri is officially my go-to snack whenever I want crispy, savory, comforting food in minutes. It deserves a spot in your flavor-packed lineup because it’s simple to make yet feels like such a treat.
My Foodie Tips:
- Shape rice gently but firmly so your grilled rice balls hold their shape
- Slather on the soy sauce glaze slowly to get that perfect caramelized coat
- Reheat on a pan or grill to keep that crispy onigiri texture alive
For variety, try classic soy sauce glaze, miso-glazed versions, or even spicy kimchi-infused Easy Yaki Onigiri. The miso yaki onigiri flavor is a total crowd favorite, but nothing beats the original soy caramel crunch!
This recipe welcomes your creativity, so mix and match fillings and seasonings to make your go-to crispy onigiri uniquely yours. I can’t wait for you to try and fall in love with Easy Yaki Onigiri as much as I did. Ready to get grilling and snack like a Japanese street food pro? Your taste buds are in for a treat!
P.S. If you love these, make sure to check out my other drool-worthy bites like these peanut butter cookie bites for your sweet tooth fix next!
Easy Yaki Onigiri
Easy Yaki Onigiri are crispy grilled Japanese rice balls brushed with savory soy sauce, perfect as a snack or side dish.
- Prep Time: 10 minutes
- Cook Time: 10 minutes
- Total Time: 20 minutes
- Yield: 4 servings
- Category: Snack
- Method: Grilled
- Cuisine: Japanese
Ingredients
- 2 cups cooked Japanese short-grain rice
- 2 tablespoons soy sauce
- 1 tablespoon vegetable oil or sesame oil
- Optional: sesame seeds for garnish
- Optional: miso paste or butter for additional flavor
Instructions
- Wet your hands with water and shape the cooked rice into firm triangular or round balls.
- Heat oil in a non-stick skillet over medium heat.
- Place rice balls in the skillet and cook until golden brown and crispy on one side, about 3-4 minutes.
- Flip the rice balls and brush the browned side with soy sauce.
- Cook the other side until golden and crispy, brushing with soy sauce as desired.
- Remove from heat and optionally sprinkle with sesame seeds before serving.
Notes
For added flavor, try spreading a thin layer of miso paste inside the rice balls before grilling or serve with a small pat of butter on top.